How to Install and Configure Adaptive Speed Limiters in Commercial Fleets
Jul 5, 2025 Resolute Dynamics
Fleet safety is no longer about telling drivers to “slow down.” It’s about building smart systems that do it for them — even when they’re tempted to do otherwise.
I’ve worked with operators from Dubai to Delhi, and one thing’s clear: speeding tickets and harsh braking aren’t just annoying, they’re expensive. Enter adaptive speed limiters — tools that automatically adjust a vehicle’s speed based on surroundings, real-time data, and behavioral patterns.
✅ Key Takeaway
Installing adaptive speed limiters doesn’t have to feel like rocket science. First, figure out if your vehicles can handle the tech. Then, fit the limiter hardware, hook it into the vehicle’s system, and program smart speed settings that match road types and driver behavior.
Once running, it reads the road and reacts faster than any human foot could. The result? Fewer tickets, safer roads, and a fleet that runs like a well-oiled machine — without breaking a sweat or a budget.
What Are Adaptive Speed Limiters?
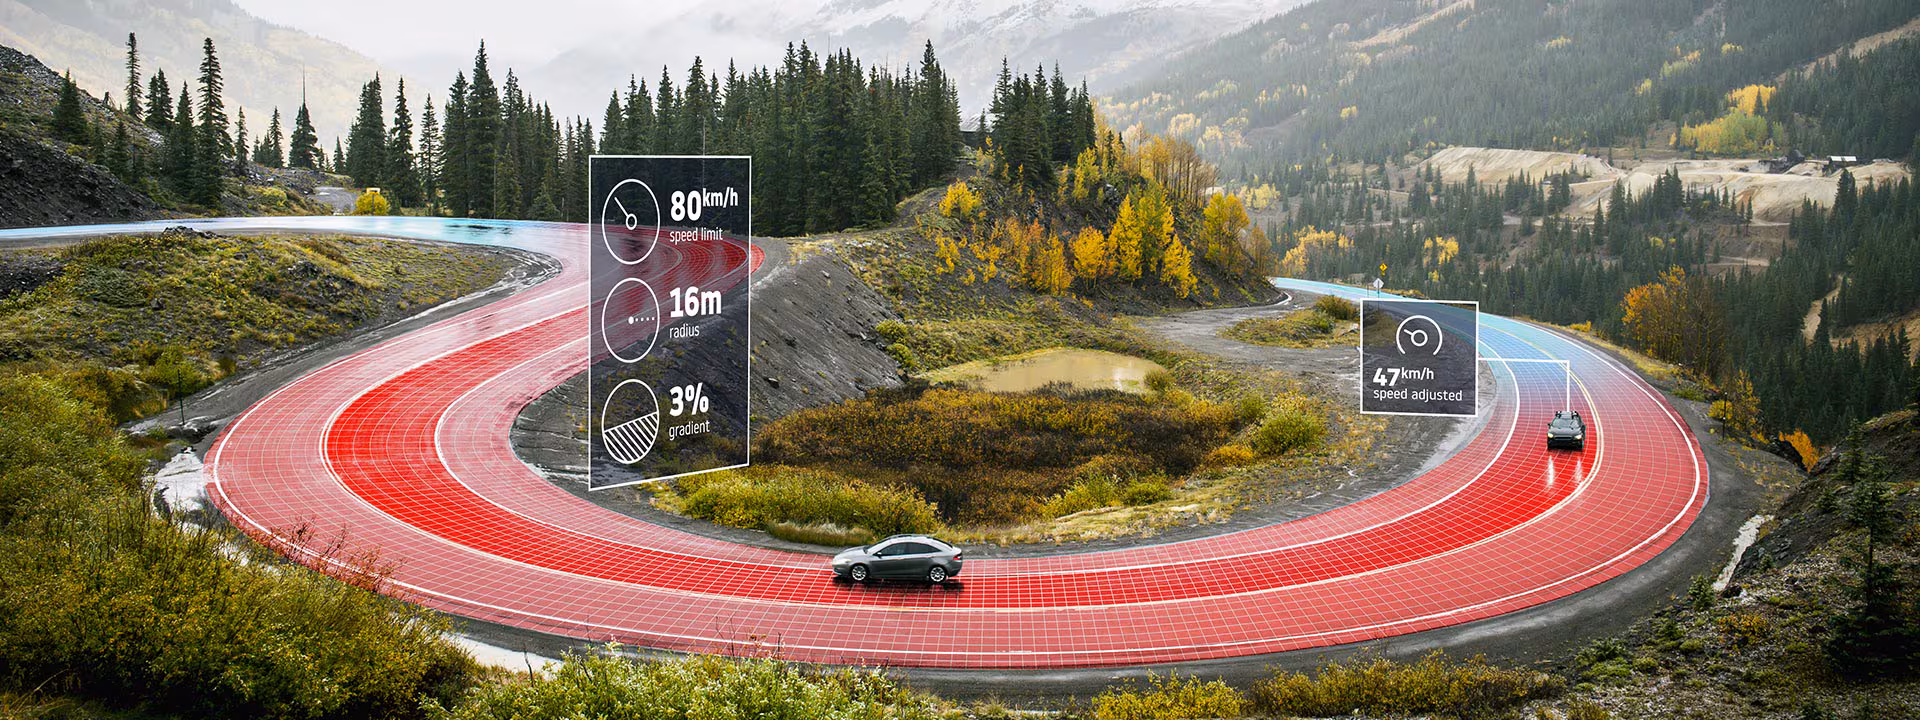
Think of them as your driver’s quiet co-pilot — always watching, always reacting. These devices use GPS, onboard diagnostics, and AI vision systems to adjust maximum speed based on where the vehicle is and how it’s being driven.
Unlike old-school speed limiters that just cut acceleration after a fixed speed, adaptive limiters respond to things like school zones, highway conditions, or even driver fatigue signals. They’re part of the broader tech stack found in modern fleet safety solutions — like those offered by Resolute Dynamics.
Want a deeper breakdown? Check out what an adaptive speed limiter is and how it works under real fleet conditions.
Why Your Fleet Needs Them
Speeding isn’t just a fine. It wrecks tires faster. It slashes fuel economy. And let’s not even talk about accidents.
Installing adaptive limiters helps you:
- Cut aggressive driving incidents by over 40%
- Lower insurance premiums through proactive risk management
- Get your compliance game tight, especially with Gulf road safety laws
- Keep maintenance costs from creeping up due to hard driving
One fleet I consulted reduced speeding violations by 63% just by installing these systems across their UAE operation. No fancy launch. Just solid tech, installed right.
How the Tech Works
An adaptive speed limiter is more than just a digital leash. It’s a decision-making unit embedded deep in your vehicle’s architecture — gathering data, analyzing it in milliseconds, and adjusting engine behavior before a driver even realizes it.
Here’s how the whole system ticks:
1. GPS Module
This isn’t your basic smartphone GPS. These modules pull from high-accuracy satellite feeds, often using multi-constellation receivers (GPS, GLONASS, Galileo). That lets the system pinpoint the vehicle’s location within a couple of meters.
It cross-references that position against:
- Digitized road maps with legal speed limits
- Dynamic zones like school areas or accident-prone junctions
- Fleet-specific geofences for delivery regions or off-limits zones
If a truck enters a 60 km/h area from a 100 zone, the limiter kicks in before the change becomes a problem.
2. Telematics Control Unit (TCU)
This is the system’s main translator. It listens to the vehicle’s CAN bus (the internal communication network), grabs data from the engine, transmission, and braking systems, then sends commands when limits need to change.
Think of it like this: The GPS says “you’re in a slow zone,” and the TCU tells the engine, “dial it down, now.”
It also logs every speed change, override attempt, and driver reaction — useful for audit trails and coaching sessions.
3. AI-Powered Cameras
This is where things get smart.
These cameras aren’t just there for recording — they analyze what they see. Using computer vision models, they identify:
- Speed limit signs
- Temporary construction signs
- Pedestrian crossings
- Weather cues like heavy fog or rain
- Traffic density
The limiter adjusts in real time. If the weather’s bad or the system spots a school zone sign, it drops the max speed accordingly — even if the GPS data hasn’t flagged it yet.
It can also flag dangerous behaviors, like tailgating or rapid lane changes, and apply subtle limits as a correction.
Driver Feedback Interface
A flashing red light doesn’t help if no one knows what it means.
These systems use audio cues, display prompts, or even haptic feedback (like steering wheel or seat vibrations) to nudge the driver. Some fleets use visual dashboards that show how close a vehicle is to its limit, others use buzzers that escalate if the limit is being ignored.
It’s about cooperation, not punishment.
The best systems coach, not control. They make drivers part of the process, not enemies of the tech.
Fleet Control Center Integration
On the backend, all this data feeds into a fleet management dashboard.
Fleet managers can:
- Monitor limiter performance across all vehicles
- Adjust speed rules remotely
- Pull up incident logs
- Get alerted when limits are ignored or overridden
This is where the magic really happens — using real-time data to keep your entire fleet safe, compliant, and consistent.
Checklist Before You Start
Before grabbing a wrench or calling your installer, prep properly:
- List All Vehicle Models: Make, model, year — the more specific, the better.
- Inspect Electrical Architecture: Newer vehicles with CAN bus systems are easier to retrofit.
- Confirm Regional Regulations: Some countries require specific calibration thresholds.
- Assess Driver Behavior Data: Know who’s got the lead foot before you automate.
And please — don’t rely on duct tape and YouTube videos. Installations done on the cheap will cost you triple later.
Installation: Step-by-Step
Whether you’re retrofitting a light commercial van or a heavy-duty truck, the process is roughly the same. Here’s what each step really means:
1. Mount the Main Unit
Where it goes: Under the dashboard or next to the Engine Control Module (ECM).
Why it matters: The main unit is the command center. It processes GPS data, reads from sensors, and sends limit commands to the vehicle.
Don’t: Mount it near heat vents or near power cables that might cause electromagnetic interference. Also, secure it tightly — vibration can cause long-term failures or loose connections.
2. Connect to Power & Vehicle CAN Bus
Power: You tap into the vehicle’s ignition or battery fuse lines — usually through the fuse box or a dedicated port.
CAN Bus: This is the car’s internal communication line. Every modern vehicle has one. You splice into it (ideally via a diagnostic harness) so the limiter can “listen” and “talk” to the vehicle’s electronic systems.
Why it matters: Without this link, the limiter has no control or awareness of what the vehicle is doing.
Don’t: Miswire the CAN High and CAN Low lines — you’ll scramble the vehicle’s signals and possibly trigger system errors.
3. Integrate AI Camera (If Applicable)
Where: Usually mounted behind the rearview mirror on the inside of the windshield, or center-dash if visibility allows.
What it does: It reads traffic signs, detects poor driving behavior (tailgating, lane swerving), and helps the limiter respond more intelligently.
Setup Tips:
- Keep it level with the road surface.
- Calibrate the field of view — too high, and it misses signs; too low, and it sees the hood.
Don’t: Let anything obstruct the lens — not stickers, tinted visors, or even dangling air fresheners.
4. Install GPS Antenna
Location matters: Mount it where it has a clear line to the sky — under the dash trim or rear parcel shelf works for many vehicles.
Why it matters: The antenna feeds constant positioning data to the limiter. If signal quality drops, the limiter may miscalculate zones or speeds.
Don’t: Place it near metal objects or wiring clusters. Those mess with reception and lead to lag in speed zone switching.
5. Run Initial Diagnostics
This is where you test the install:
- Check for error codes
- Confirm CAN bus signals are flowing
- Make sure GPS data is accurate
- Validate the camera feed if it’s part of the system
You’ll use a calibration tool or software provided by the limiter manufacturer. This step confirms the unit is reading the right data and not interfering with other systems.
Don’t: Skip this or guess your way through it. One skipped check can result in a system that appears “on” but does nothing.
6. Test in Safe Zones
Why: Before rolling onto open roads, take the vehicle into a controlled environment — like a depot yard or quiet industrial zone.
What to test:
- Does the limiter activate at set speeds?
- Can you simulate a zone change and see a response?
- Are alerts being sent to the driver interface?
Don’t: Rely on highway testing as your first live run — too risky, and harder to diagnose under pressure.
Final Installation Tips:
- Use heat-resistant zip ties and cable sleeves to keep wiring tidy and secure.
- Label each connection. Seriously — future-you (or your tech team) will thank you.
- Take photos of the install. It helps during future maintenance or audits.
Configuring the Limiter
Think of this as setting the rules of the road — but on your terms, across your entire fleet, without having to ride shotgun in every truck.
- Define Geo-Zones
You’re not just setting one speed for all roads. You’re telling the system:
“Hey, this is a school zone. Slow it down. But out on the bypass? Let it breathe.”
Here’s what it looks like:
- City centers: Cap at 50–60 km/h
- Highways: Go up to 120–130 km/h
- Industrial areas or loading docks: Maybe 30 km/h or less
You do this by drawing digital boundaries (geofences) using GPS maps inside your fleet platform. Some systems let you import zones in bulk, which saves hours.
Pro tip: Layer these zones with time rules. Example: reduce limits around schools during morning and afternoon hours only.
2. Set Max Speeds per Zone
Once your map is divided, set the speed for each zone.
But it’s not just “set it and forget it.” You can:
- Create buffer zones — for example, let drivers go 5 km/h over before a warning triggers
- Apply gradual deceleration curves so you don’t slam on the digital brakes
This keeps the system smooth and avoids whiplash-inducing speed drops.
3. Link Behavior Profiles
Here’s where things get clever. Some platforms let you assign limiter settings based on driver history.
Example:
- New or high-risk drivers? Tighter controls, stricter caps.
- Veteran drivers with clean records? More leniency, faster recovery from overrides.
This means the limiter doesn’t treat every driver like a ticking time bomb. It adapts.
And yes, profiles can auto-adjust as drivers improve or rack up violations.
4. Enable Alerts
Speed limits without feedback are just invisible walls. You want your drivers to know when they’re pushing it — without scaring them off the road.
You can configure:
- Audible alerts (buzzers or tones)
- Visual cues (screen icons or blinking LEDs)
- Voice prompts (“Reduce speed to 60 km/h”)
The goal isn’t to punish — it’s to coach. Repeated alerts can even trigger automated messages to the fleet manager.
5. Create Event Triggers
This is the safety net.
You tell the system: “If a vehicle exceeds the limit by 10 km/h for more than 5 seconds, activate automatic deceleration.”
Other common triggers:
- Overspeed for more than X seconds = Limit throttle
- Repeated overspeed in a day = Lock vehicle speed for rest of trip
- Entering a restricted zone at night = Alert ops team instantly
This lets the system self-regulate without nagging every time someone nudges the pedal.
Bonus: Remote Updates
The best platforms (like Resolute Dynamics’) allow you to update rules remotely. So when roadwork pops up in Sharjah or Dubai rolls out a new delivery zone speed limit, you don’t need to recall every van.
One click. Updated fleet-wide.
Final Thoughts on Config
Configuring the limiter is where you stop reacting and start predicting. You build a system that’s not just smart — it thinks like your business does.
Set it up right, and your vehicles won’t just follow the rules — they’ll anticipate them.
Want help creating sample zone configs or driver profiles? Say the word.
Keeping It Running Smooth
Technology’s not fire-and-forget. Here’s how to keep it humming:
- Review Data Weekly: Are limiters doing their job? Who’s bypassing them?
- Adjust Rules as driving zones change or company policies evolve
- Update Firmware via OTA if your provider allows it
- Do Physical Checks during monthly vehicle maintenance
And always involve your drivers. If they see this tech as Big Brother, they’ll hate it. If they see it as something that protects them from a fender bender — they’re all in.
Real-World Example: UAE Logistics Fleet
Let me give you a glimpse.
A refrigerated transport company in Sharjah ran into two problems: speeding in heat-sensitive zones, and drivers cutting corners on delivery times.
They installed adaptive limiters and synced them with internal temperature controls. If the van sped up too much, cooling was compromised — so the limiter throttled back speed, maintaining product integrity.
Within 3 months:
- Speeding dropped by 61%
- Temp-related product losses? Zero.
- Driver complaints? Surprisingly few.
Why? The system was explained to them like a safety net, not a punishment.
Common Issues and Quick Fixes
No system runs flawlessly 100% of the time. But knowing what usually goes wrong and why helps you fix problems before they snowball into fleet-wide disasters.
Issue 1: Speed Not Adjusting in City Zones
What’s Really Happening:
The limiter doesn’t kick in when the vehicle enters a low-speed zone. Drivers sail into 50 km/h areas doing 80, and the system just shrugs.
Root Cause:
- GPS lag: The system takes too long to recognize the new location.
- Outdated maps: The digital map thinks it’s still on a highway.
- Weak signal: If the GPS antenna is blocked (like under metal), it loses accuracy.
Quick Fix:
- Reposition the GPS antenna so it has a clear line to the sky.
- Update the mapping software to include new city layouts and restricted zones.
- Consider switching to a dual-feed GPS (e.g., GNSS) if your fleet operates in dense urban zones where tall buildings block signals.
Pro tip: Always test GPS lock time after install — a 10-second delay at 80 km/h = 220 meters too late.
Issue 2: Random Limiter Activation
What’s Really Happening:
The limiter slows down the vehicle even though everything seems normal — no zone change, no behavior trigger. Drivers call it “the ghost brake.”
Root Cause:
- CAN bus misread: The system is picking up faulty signals from the wrong wire.
- Interference: Poor wiring near ignition coils or radio antennas can scramble signals.
- Cross-talk between sensors if multiple systems are installed (e.g., ADAS, dash cams, telematics).
Quick Fix:
- Check CAN channel wiring — you may be tapped into the wrong line. Each vehicle model has a specific pinout for CAN High and CAN Low.
- Use shielded cables and avoid routing wires near heavy electrical systems.
- Test signal traffic using diagnostic software (most TCU vendors supply this).
Pro tip: Label every connection during install. Saves hours of rework.
Issue 3: Driver Override Abuse
What’s Really Happening:
Drivers find ways to bypass the limiter — disabling alerts, manually overriding settings, or even yanking power cables mid-route.
Root Cause:
- Weak permissions: Drivers have admin-level access on mobile apps or in-cabin screens.
- Settings not locked after configuration.
- Physical access to limiter not restricted.
Quick Fix:
- Use role-based access control on your fleet platform. Drivers should only see what they need.
- Lock out speed settings with a passcode or remote admin override.
- Physically secure the limiter unit — hide it, cover it, or box it in.
Pro tip: Log all override attempts. If you see patterns — it’s time for a driver coaching conversation or policy update.
Final Thought
Most limiter issues aren’t caused by bad hardware. They’re caused by:
- Skipping small steps during install
- Letting default settings stay untouched
- Underestimating creative drivers
Fix those, and you’ll go from constant calls to smooth sailing.
Want a printable quick-fix sheet or pre-install checklist? Just say the word.
Buyer’s Checklist for Adaptive Speed Limiter Systems

When choosing an adaptive speed limiter for your fleet, don’t just go with the first vendor that throws jargon at you. Use this checklist to make sure you’re investing in a system that fits your operation — not fighting it.
✅ What to Look For:
- Vehicle Compatibility
Make sure it works across your fleet — diesel, electric, hybrid, and mixed models.
- Telematics Integration
Can it connect to your current fleet platform (like Geotab, Samsara, Resolute Dynamics)?
- OTA (Over-the-Air) Updates
Remote updates save time. Look for systems that support them by default.
- Installation & Training Support
Check if the vendor provides certified installers, install manuals, or team training.
- Driver Access Control
Prevent override abuse by restricting what drivers can change or access.
- Warranty & Support Coverage
Ask about hardware warranty, on-site service, response times, and ticket SLAs.
- Configuration Flexibility
Can you set speed rules by zone, driver type, or delivery schedule?
👉 Choose smart. The right system pays for itself in fewer tickets, safer roads, and smoother ops.
Closing Thoughts
Installing adaptive speed limiters isn’t just a tech upgrade. It’s a culture shift.
Fleets that take the leap gain tighter control, stronger compliance, and fewer headaches. And if you ask me, anything that helps drivers get home safe and on time — without playing traffic cop — is worth its weight in gold.